Following
some renovation work, my in-laws found themselves in need of a kitchen cabinet.
The piece was supposed to occupy a specific place, so there was little space
for manoeuvre when it came to determining the dimensions: it had to be 80
centimetres wide by no more than 30 centimetres deep. While there was some
flexibility in deciding the height, it too was influenced by the surrounding
elements, and was left at 2 metres.
The most
eye-catching element of the kitchen is a rustic fireplace, so it only made
sense to use the same style for the cabinet.
In Romania,
folk art has been particularly vivid and we can therefore draw upon a wealth of
traditional motifs and patterns. While there were many regional styles, there are
certain traits that are immediately identifiable as “traditional” or “rustic”: hardwoods
were used abundantly (later, when softwoods were introduced, they were heavily
dyed, to mimic their appearance); tool marks were often left visible and the
wood was only rarely planed; natural shapes, like wood crotches, were
integrated and used structurally; straight lines alternated with arches and
curves; the decoration was almost always incised or chip carved, although paints
were also used.
Many of
these elements have been recuperated and reinterpreted by Romanian architects
and furniture-makers active in the first decades of the 20th
century, a time of great artistic achievements, when truly original and
distinctive pieces were created.

With that
in mind, I set about designing my kitchen cabinet. The sides and headboard feature
arches inspired from the religious architecture of Romania, which has been
influenced, in turn, by the traditions of Byzantium and the Middle-East.


The three
uppermost shelves are curved and their edges have received a gentle chamfer.

Moreover,
their spacing is graduated (between the first and the second shelf, the distance
is of 55 centimetres; it decreases to 45 between the second and third, then to 35, then finally to 30
between the fourth and the fifth). The aim here was to make the cabinet look
slender and elegant.
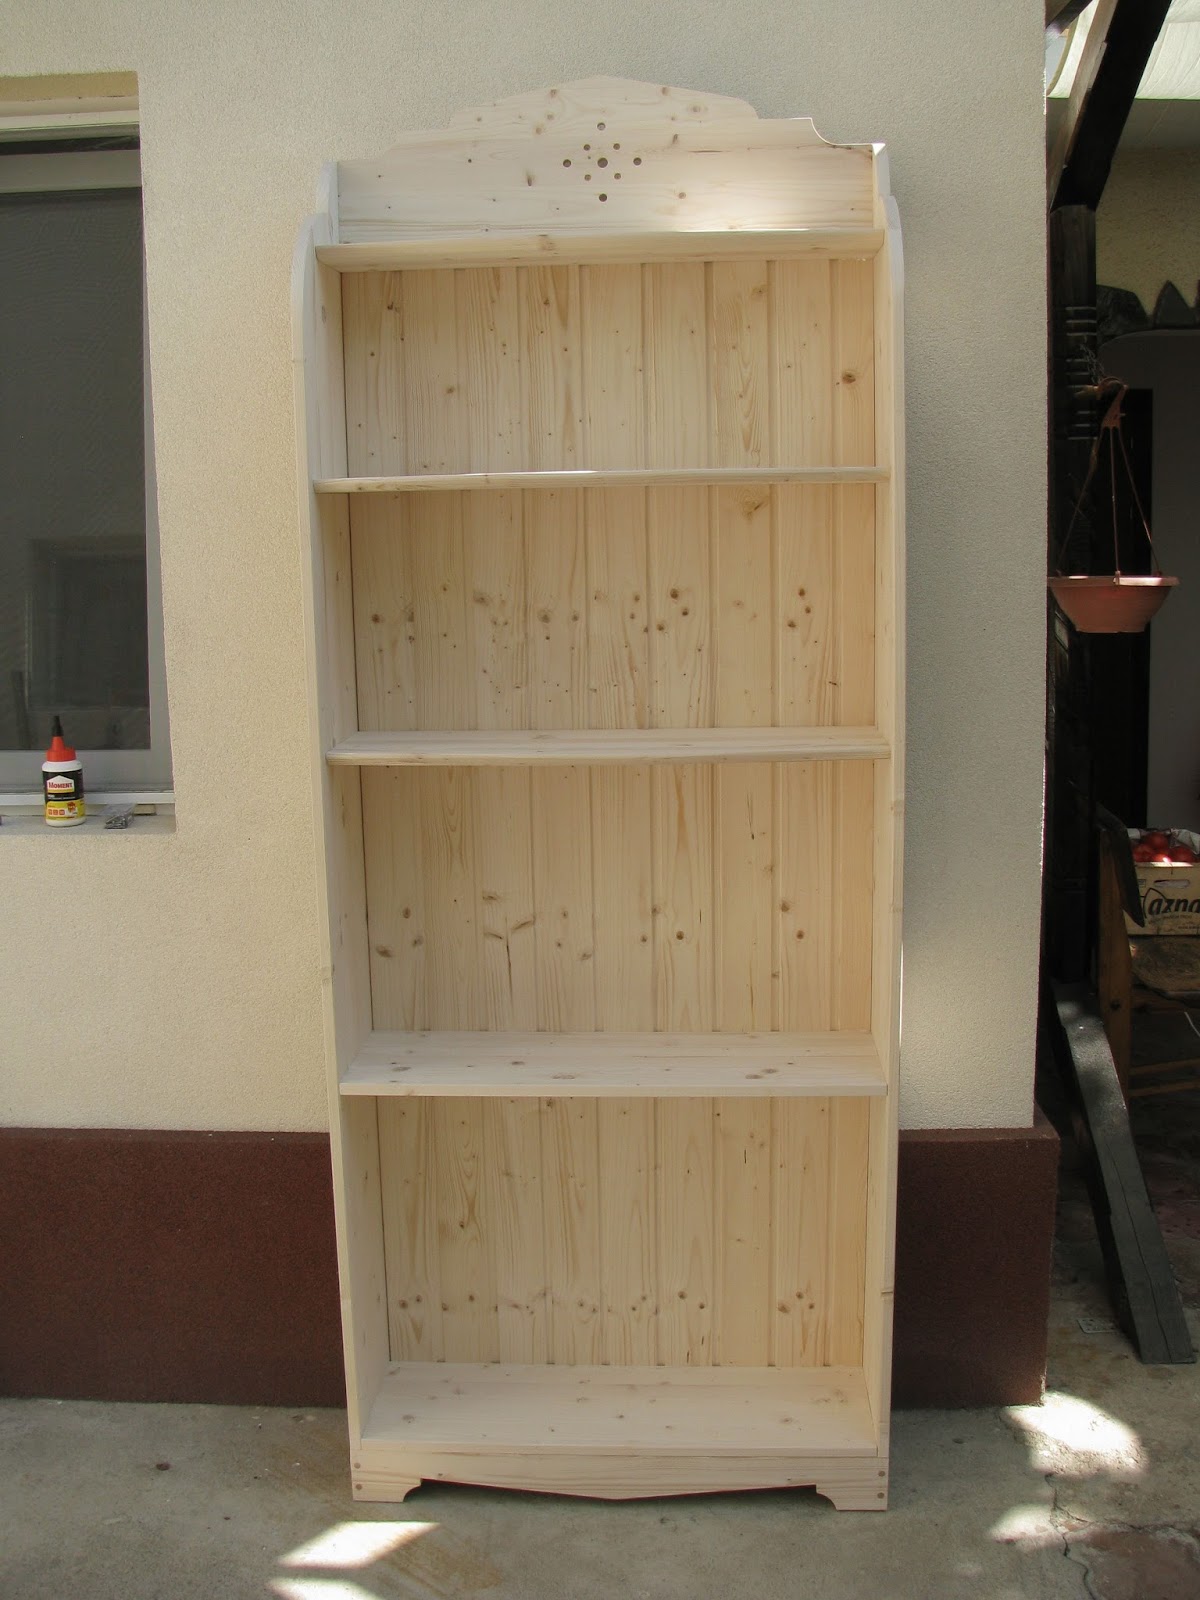
In order to
retain the rustic appearance, the back of the cabinet has not been lined with
plywood, but rather with tongue-and-grooved pine boards (sold commercially as
wainscoting).
The doors
have a frame and panel design (the panel is not solid, but uses the same pine
wainscoting). For the frame, I chose a splined mitre design, using walnut
veneer for the spline.


When it
came to finishing the project, I’ve used two layers of a walnut-coloured dye
from Oskar. In order to create a contrast, I’ve left the panelling of the doors
in their natural colour.

Finally, I’ve
applied three layers of a water-based varnish from Kober. This has been the first
time I’ve used this water-based finish, and I’ve been pretty happy with the
results.
The finished
project, installed in its place in the kitchen, looks like this.

Salut. Super dulap. Am nevoie de un sfat daca se poate...cum pot face sa finisez o bucata de lemn (scandura de-a dreptul) astfel incat sa ajunga la un aspect lucios? (Si daca e posibil fara scule prea multe ....)
RăspundețiȘtergereSalutare, multumesc pentru apreciere! In privinta scandurii, pentru a obtine un aspect lucios, cea mai indicata cale este aplicarea unui lac pe baza de rasini alchidice. Evident, este necesar ca scandura sa fie bine slefuita inainte, cel putin cu glasspapier de granulatie 120, daca nu si mai mult. Dupa aplicarea primului strat de lac, inevitabil pe suprafata vor aparea mici rugozitati - e vorba de particule de praf care se depun pe rasina alchidica in timp ce aceasta se solidifica. Acestea trebuie netezite cu un abraziv fin (eu folosesc un abraziv pe strat de buret, care se gaseste ieftin la toate lanturile DIY), inainte de aplicarea urmatorului strat de lac. Intotdeauna se recomanda cel putin doua straturi de lac - am incercat si unul singur, dar inevitabil pe o suprafata de lemn unele portiuni vor absorbi mai mult decat altele, ceea ce va face ca unele bucati sa apara lucioase, altele mate. Dupa intarirea completa a celui de-al doilea strat, se poate aplica, la nevoie, un al treilea, mult diluat. Recapituland, ca instrumente de lucru: glasspapier in cel putin 2 granulatii (100 pentru faza initiala, 120 sau 180 pentru cea finala); buret abraziv de granulatie 220 sau mai mare; lac pe baza de rasini alchidice si solventul aferent; pensula pentru aplicare (as recomanda cel putin 2 - eu tind sa le si arunc dupa folosire, fiindca de obicei nu am timp sa le spal asa cum se cuvine).
RăspundețiȘtergere